Showing posts with label New Features for Windows 8. Show all posts

How to configure metered connections in Windows 8

How to configure metered connections in Windows 8

As Windows 8 is designed to be used on mobile devices as well as desktop computers, it includes a feature called metered connections. A metered connection is a network connection where you have a limited amount of data usage per month and if you go over that amount you get billed extra charges. If you are using a network connection that has a limited data plan, then it is important to enable it as a metered connection so Windows 8 knows not to download device updates or Windows updates over it. Once a connection is configured as a metered connection system downloads will only be allowed when you are on your normal wireless connection.

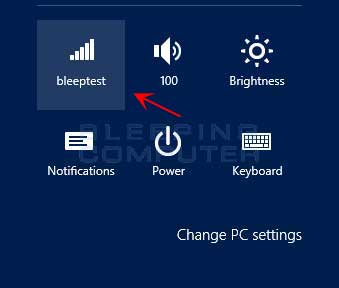
To enable a network connection as a metered connection, open the Settings charm bar by pressing the Windows key and at the same time press the Ikey (Windows Key + I key) on your keyboard. This will open the Settings Charm Bar as shown below.

Settings Charm Bar

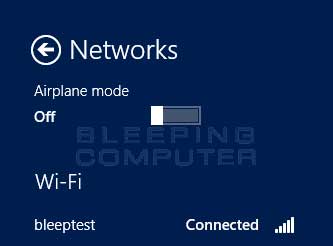
Click on the wireless network connections button as indicated by the red arrow in the image above. This will open a list of available wireless network connections.

Available Connections

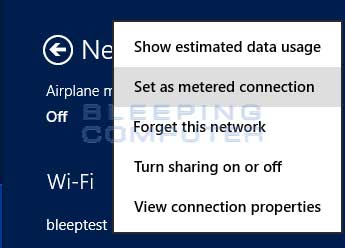
Right-click on the connection that you wish to make a metered connection and a menu will appear.

Set as a metered connection

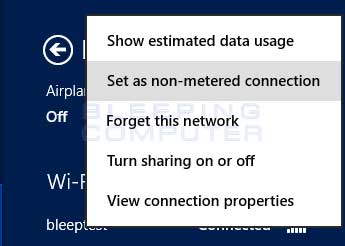
Click on the Set as metered connection menu option. This connection will now be classified as a metered connection in Windows 8. In the future if you wish to make a metered connection a normal unmetered one , right-click on it and to bring up its menu.

Set as non-metered connection

When the menu appears, click on the Set as non-metered connection menu option to make it a normal connection again.
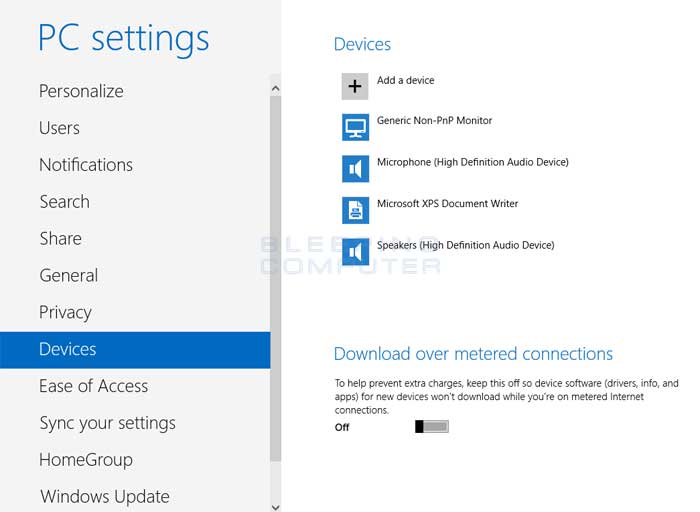
Windows 8 has a default setting that does not allowed device downloads and Windows updates to occur over metered connections. This setting is controlled via the Devices category of the PC Settings screen. When you go into the Devices settings and scroll down you will see an option for allowing downloads to occur over a metered connection.

Devices Settings

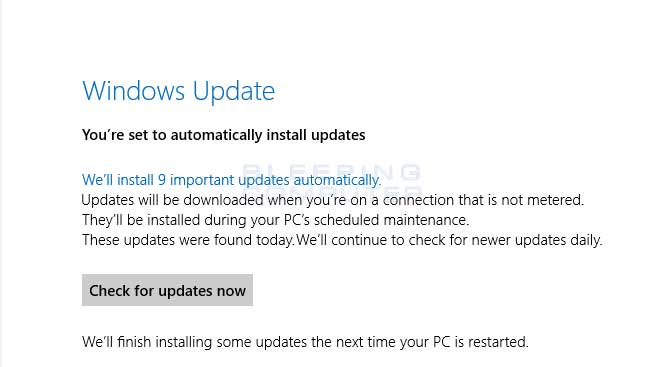
By default, this is set to Off, which does not allow downloads to occur. If you wish to allow downloads over a metered connection, you should set this setting to On. It is advised that you keep this setting on Off to help avoid overage charges on your data plans. An example of how Windows Update works when this setting is off and you are on a metered connection can be see in the image below.

Windows update metered message

As you can see from the above screen, now that metered connections are enabled Windows will not install updates until you are connected to a connection that is unmetered. This will help to protect you from going over any bandwidth limits that you connection may have.
Continue Reading →

How to enable PIN sign-in for domain users in Windows 8

How to enable PIN sign-in for domain users in Windows 8


Windows 8 has a feature where you can use a 4 digit PIN to sign-in to your Windows account. If you are a domain user, though, this feature is disabled by default. It is possible, though, for an Administrator to enable a policy that allows this feature to be used by domain users. If you wish to enable this feature for domain users, please follow the steps below.
Note: If you are not using Windows 8 Professional or Enterprise you will not have access to the group policy editor. Instead you should follow the instructions here.
To access the Group Policy Editor in Windows 8, you should type Group Policy in the Start Screen and then click on the Settings category. The option for Edit Group Policy should now appear. Click on the Edit Group Policy option and the Group Policy editor will open. Under Local Computer Policy expand the tree to the following path:
Computer Configuration\Administrative Templates\System\Logon
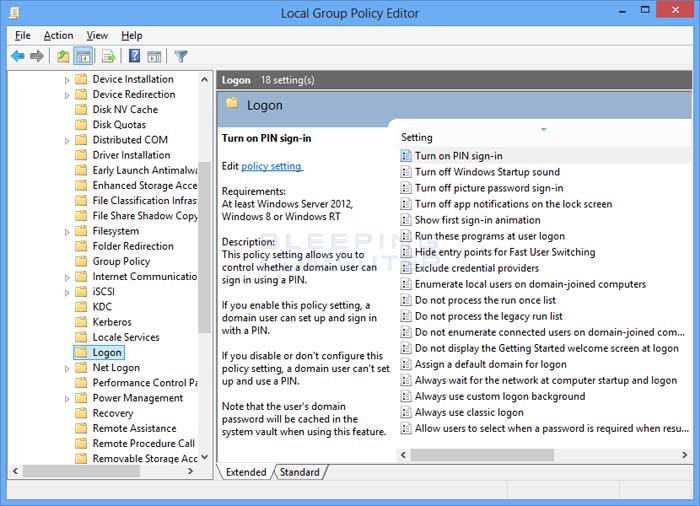
When you see Logon select it so that the screen looks like the following:

Logon Policies

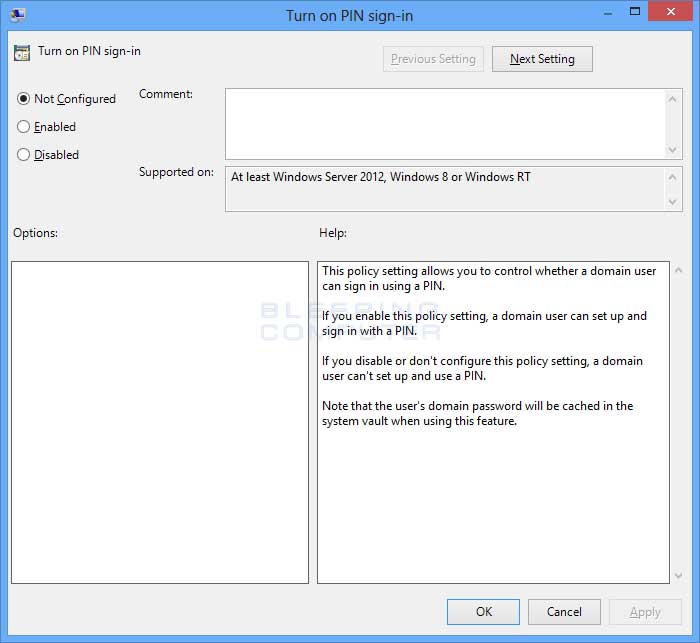
In the right-hand pane you should now see a variety of settings. Double-click on the Turn on PIN sign-in setting and its properties screen will open.

Pin sign-in policy

Select the Enabled radio button and then click on the Apply button. Finally click on the OK button and close the Group Policy Editor. Windows 8 will now allow domain users to use PIN sign-in on a domain.
If you are not using Windows 8 Professional or Enterprise you will not have access to the Group Policy Editor. Instead you will need to enable the setting through the Windows Registry. This setting can be enabled by creating the AllowDomainPINLogon REG_DWORD value under theHKEY_LOCAL_MACHINE\SOFTWARE\Policies\Microsoft\Windows\System Registry key and setting it to 1.
Note: You should only use these Registry files if you do not have access to the Group Policy Editor.
If you do not feel comfortable editing the Registry, you can download this Registry file that will enable PIN sign-in for domain users:
Just download the above Registry file and double-click on it. When it asks if you wish to merge the data, click on the Yes button.
If you want to disable the ability for domain users to use PIN sign-in you can run this Registry file:
If you have any questions regarding this process, please feel free to ask us in the Windows 8 Forum.
Continue Reading →

How to access the Power User Tasks Menu in Windows 8

How to access the Power User Tasks Menu in Windows 8

Windows 8 includes a new menu called the Power User Tasks menu that allows quick access to various power user functions in Windows 8. This menu can be accessed from any screen and includes options such as the classic control panel, event viewer, and the elevated command prompt. This makes it easier for a user to quickly perform advanced tasks in Windows 8.
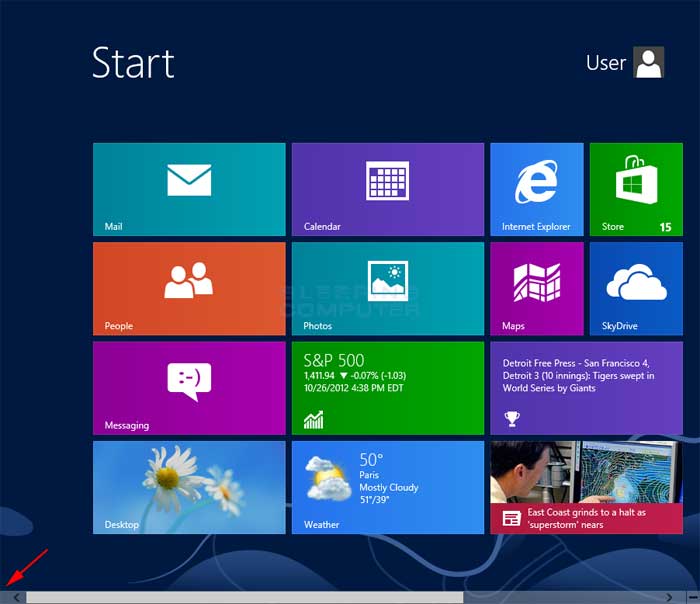
To access the Power Use Tasks menu, you need to hover your mouse cursor over the lower left corner of the screen as shown in the image below.
Tip: You can also use the Windows+keyboard combination to open up the Power Users Task Menu.

Start screen

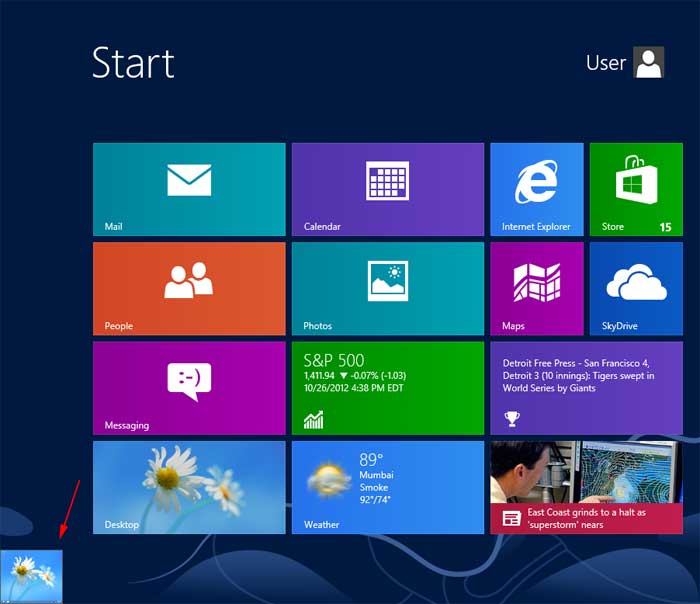
When you hover your cursor, the preview thumbnail will be shown that displays the screen of the application that you had last used.

Preview thumbnail

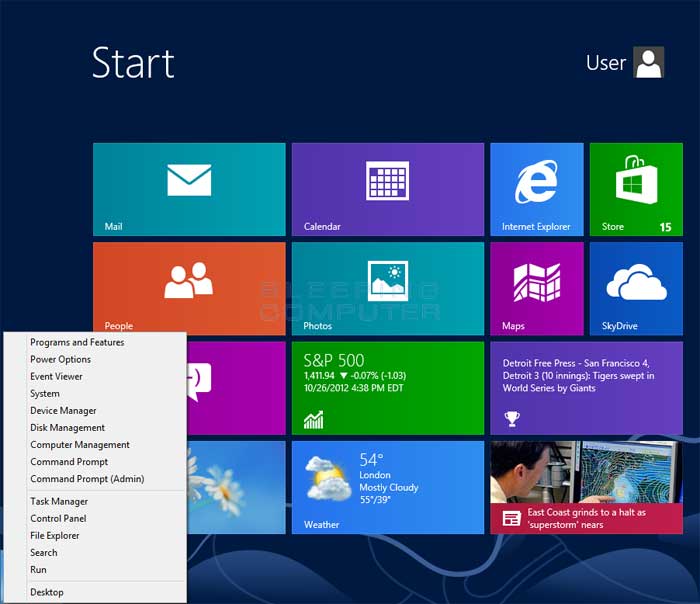
Whem the preview thumbnail appears, right-click with your mouse and the Power Users Task menu will appear.

Power Users Task Menu

This menu allows quick access to the following Windows applications or sections:
Programs and features
This option will bring you to the Programs and Features screen where you can uninstall programs or install other Windows features.
Power Options
The Power Options screen allows you to control the power settings on the computer.
Event Viewer
The Event Viewer application allows you to browse various system alerts and information.
System
This option will bring you to the System screen where you can view various information about your computer and Windows. This screen also acts as a launching area for other configuration screen such as the Device Manager, Remote Settings, and System Protection.
Device Manager
The Device Manager allows you to view the hardware installed on your computer or tablet.
Disk Management
The Disk Management application allows you to manage the hard drives in your computer.
Computer Management
The Computer Management screen provides access to various administrative screens where you can manage user accounts, view the event logs, and manage your hard drives.
Command Prompt
This option will open a command prompt.
Command Prompt (Admin)
This option will open an elevated command prompt.
Task Manager
The Task Manager allows you to see what processes are running your computer, its current memory and cpu usage, and other information.
Control Panel
This will open the classic control panel where you can configure various settings in Windows 8.
File Explorer
Opens File Explorer to manage the files on your computer or tablet.
Search
Switch to the Search funcion of the Windows 8 Start Screen.
Run
Opens a Run box where you can enter a command to execute.
Desktop
Brings you to the desktop.
To access one of these tasks, simply click on the choice you wish to use and you will automatically be brought to that feature or screen.
Continue Reading →

How to play DVDs in Windows 8

How to play DVDs in Windows 8


If you try to play a DVD in Windows 8 you may have noticed that you are unable to do so. This is because Microsoft removed free DVD playback from Windows 8 due to the costs of licensing the codecs necessary to properly play DVDs. Instead, if you wish to play a DVD you must first upgrade to Windows 8 Pro using the Windows 8 Pro Pack, or if you are already using Windows 8 Pro, install the Windows Media Center Pack. Once you install the feature pack you will be able to play DVDs in Windows 8 Media Center.
In this tutorial we will outline two methods you can use to enable DVD playback in Windows 8. The first options utilizes the free open source VLC Media Player software that can be used to play almost any DVD in Windows 8. The second option requires you to install the Windows 8 Media Center feature in order to enable Windows 8 to play DVDs.
The two options are:
Option 1: Use VLC Player to watch DVDs in Windows 8
Option 2: Install the Windows 8 Media Center Pack in Windows 8
If you use Windows Media Center and would like to continue using it in Windows 8, then the obvious choice is to install the Media Center Pack. On the other hand, if all you wish to do is watch a DVD on your Windows 8 computer, then VLC Player is all that you need.

Option 1: Use VLC Player to watch DVDs in Windows 8
The cheapest, and easiest, solution to to play DVDs in Windows 8 is to download and install VideoLan Player, otherwise known as VLC Media Player. VLC Player is a free and open source multimedia player that plays most multimedia files as well as DVD, Audio CD, VCD, and various streaming protocols. Downloading and installing VLC Player is easy. Simply go to the following page and click on the Download VLC button
VLC Media Player Home Page
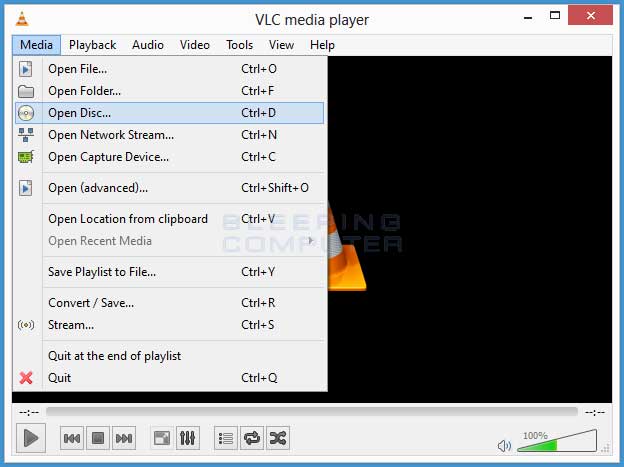
Once you download VLC Player, double-click on the installation file and follow the prompts. When installing, please use all the default settings and when you are finished, VLC will have started. Once VLC Player is installed, you can play a DVD by clicking on the Media menu and then selecting Open Disc as shown below.

Open Disc option

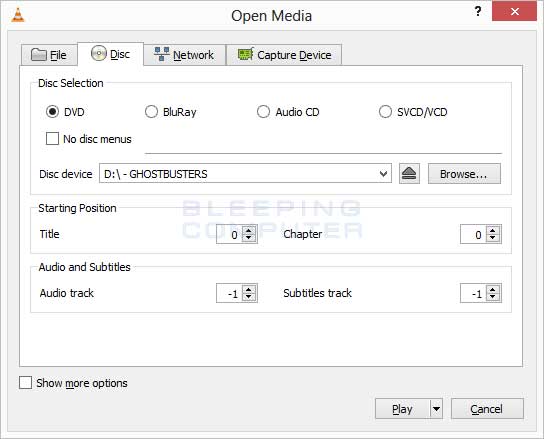
Once you click on the Open Disc option you will be brought to the disc selection menu.

Select disc

In the Disc device field select the disc drive that contains the DVD you wish to play. Then click on the Play button.

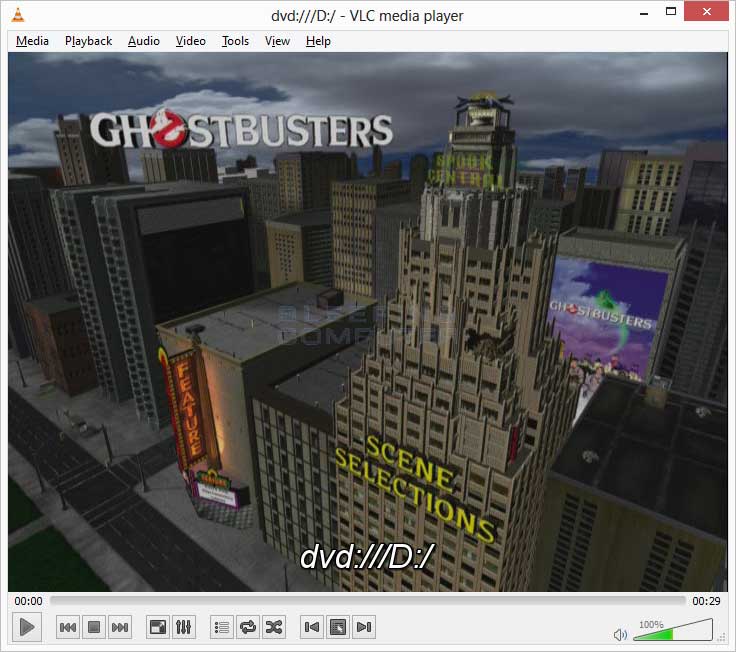
Movie playing

Your DVD will now start playing within the VLC Player window. To make it play back in full screen, click on the Video menu and then select Full Screen.

Option 2: Install the Windows Media Center Pack in Windows 8
In order to natively play back DVDs in Windows 8, you must be running Windows 8 Pro. Microsoft is currently offering two promotions that will allow you to add the Windows Media Center feature to Windows 8. The first promotion is for Windows 8 users and is the Windows 8 Pro Pack for $69.99 which upgrades Windows 8 to Windows 8 Pro and includes the Windows 8 Media Center. The second promotion, for those already using Windows 8 Pro, is the ability to get a free activation key for the Windows 8 Media Center Pack until January 31, 2013.
To add the Windows Media Center Pack, please use one of the following methods depending on Windows 8 Version you are using:
Method 1: Install the Windows 8 Pro Pack for Windows 8 Users
Method 2: Install the Windows Media Center Pack for Windows 8 Pro Users

Method 1: Install the Windows 8 Pro Pack for Windows 8 Users
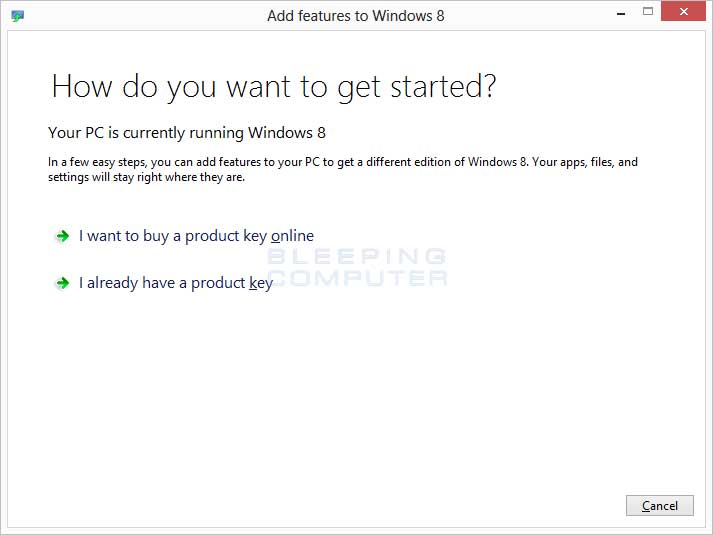
To install the Windows 8 Pro Pack, you first need to purchase it within Windows. To do this, type Features in the Windows 8 Start Screen, then click on the Settings search category, and then click on the Add features to Windows 8 search option. This will open the Add features to Windows 8 screen.

Add Features to Windows 8 Screen

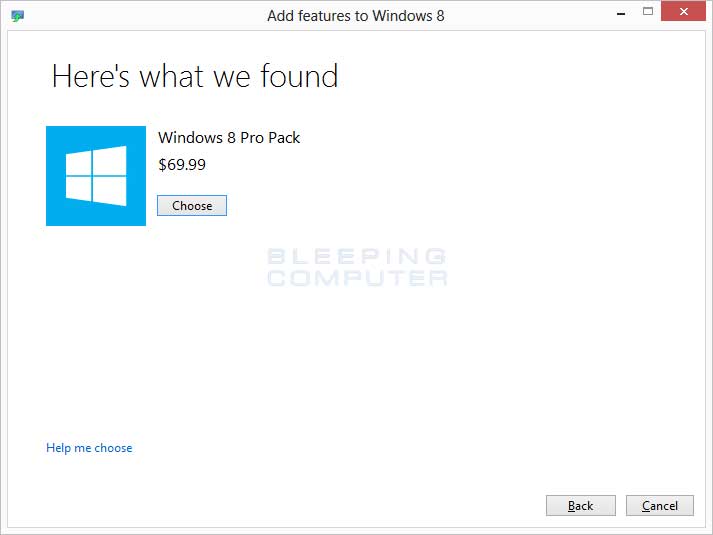
Click on the I want to buy a product key online and you will be brought to the list of features you can install.

Feature choices screen

Click on the Choose button under the Windows 8 Pro Pack listing and Windows will bring you to a screen where you need to enter your contact information. Fill in the information and click on the Next button. You will then be at a screen asking for your payment information. Select your payment method and then fill in your information and press the Next button. You will now be at the final confirmation screen, where you should click on the Buybutton. When your purchase goes through, Windows will prompt you if you are ready to install the software. Accept the license agreement and then click on the Add features button to install the software. This could take a while and your computer may restart during the installation process, so please be patient.
When it has finished, Windows will be upgraded to Windows 8 pro and will be able to play DVDs from within Media Center.

Method 2: Install the Windows Media Center Pack for Windows 8 Pro Users
If you are using Windows 8 Pro, then you can can get a free license to the Windows 8 Media Center Pack until January 31, 2013 by going to the following page.
Windows 8 Features Page
Scroll down to the bottom of the page and submit your email address. Within 24 hours you should receive an email containing an activation code that you can use to install the Windows 8 Media Center pack. After January 31, 2013 the Windows 8 Media Center Pack will cost $9.99.
Once you receive your product code you need to enable the Windows Media Center feature in Windows. To do this, type Features in the Windows 8 Start Screen, then click on the Settings search category, and then click on the Add features to Windows 8 search option.

Add Features to Windows 8 Screen

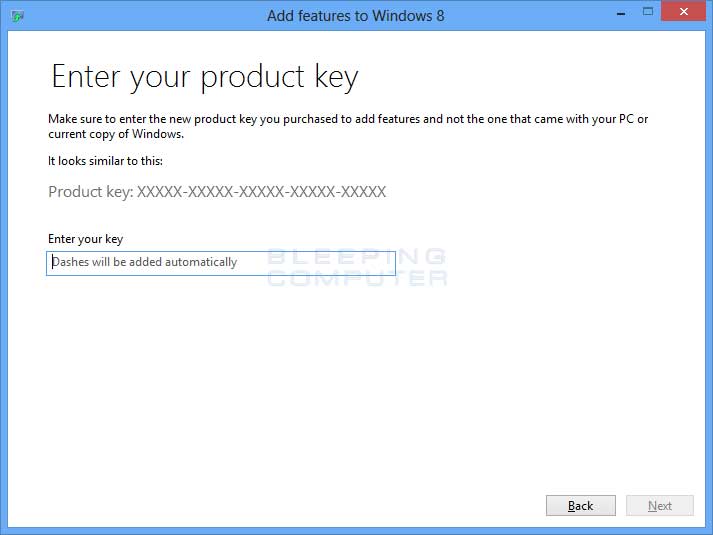
Click on the I already have a product key option and you will be brought to a screen that prompts you to enter your product key.

Enter product key screen

Enter the product key that was emailed to you and click on the Next button. Windows will now prompt you if are ready to install the software. Please accept the license agreement and click on the Add features button to install the software. This could take a while and your computer may restart during the installation process, so please be patient.
When Windows 8 is finished installing the feature, Windows Media Center will be installed and you will be able to play DVDs on your computer.
Continue Reading →

Introduction to the Windows 8 Charm Bar

Introduction to the Windows 8 Charm Bar


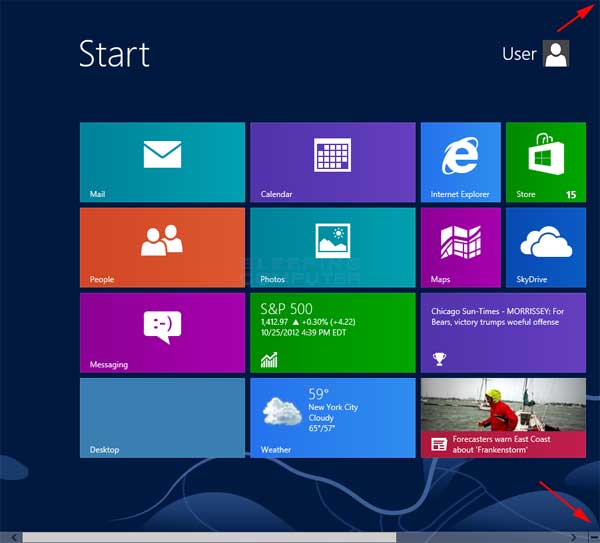
The Windows 8 Start screen has a new feature called the Charm Bar that offer quick ways to access various functions in Windows 8 as well as the ability to share information with others. This Charm Bar is available on every screen in Windows 8, including the Classic Desktop. To access the Charm Bar, simply hover your mouse over the upper right and bottom right corners of your screen.
 Shortcut: You can also use the Windows+C keyboard combination to open the Charm bar.
Start screen charm bar corners

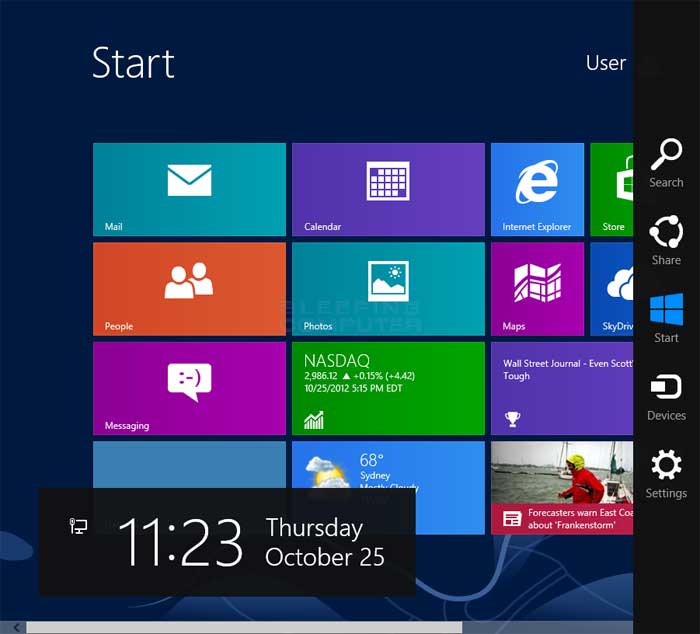
When you do so, the Charm Bar will appear on the right side of the screen.

Charm bar

As you can see, when the Charm Bar is open the time and date is displayed. You will also see a vertical bar on the right side of the screen with 5 options labeled SearchShareStartDevices, and Settings. These options are called charms and provide quick access to various aspects of Windows 8. A great feature of charms is that they change function based upon the app that you are currently in. This will be further explained as we discuss each of the charm buttons.
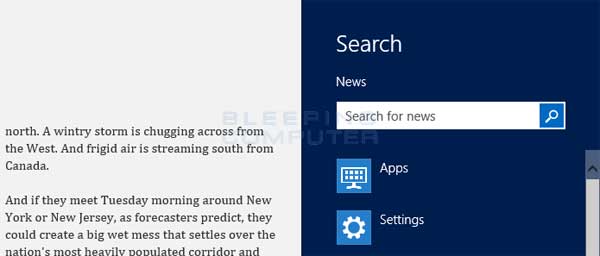
The Search charm allows you you to search for a particular keyword in the screen you are in. The Search charm's behavior changes depending on the app that is currently active. If you are in the Start Screen, then the Search charm will search for files, apps, or settings. On the other hand, if you are in the Maps app it will search for a location or if you are in the News app it will search for a particular news story.

Searching the News

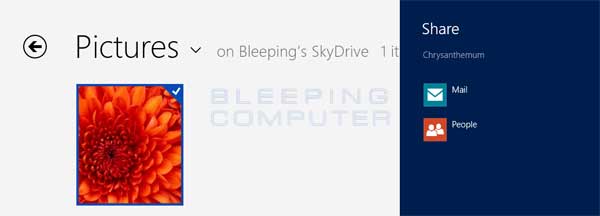
The Share button allows you to share information from a particular app with someone else. A core component of Windows 8 is being social and you will find that the Share charm integrates into many of the Windows Store apps so that you can easily share information with friends, family, and colleagues. Just like the Search charm, the Share charm's function will change depending on the app you are in. For example, the Share charm has no function in the Windows Start Screen. On the other hand, if you are in SkyDrive and select a particular document, then you can open the Share charm and send the particular item via Email or through the People app.

Sharing a picture from SkyDrive

The Start charm simply switches you back and forth between the Windows Start screen and the last used application. If you are in the Classic Desktop and use the Start charm, it will bring you back to the Windows Start Screen. Then if you use it again from the Windows Start Screen it will bring you back to the Classic Desktop. In many cases it is just easier to use the Alt key on your keyboard, which provides the same functionality.
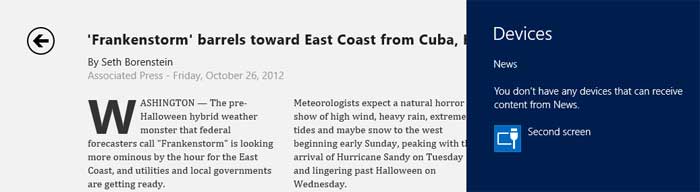
The Devices charm allows you to send the contents of the screen you are looking at to another device. For example, if you have a a second monitor attached to your computer, you can select it to display the contents from a particular app. Or if you are in the Maps app, you can select a printer to print to.

Send to second display

The Options charm allows you configure various Windows settings, app settings, shutdown and restart your computer, and other basic hardware tasks. From any app, including the Windows Start Screen, the Options charm will always display Network, Volume, Brightness, Notifications, Power, and Keyboard options. These allow you to control the associated aspects of your computer. The power option also allows you to shutdown, restart, or put your computer to sleep.
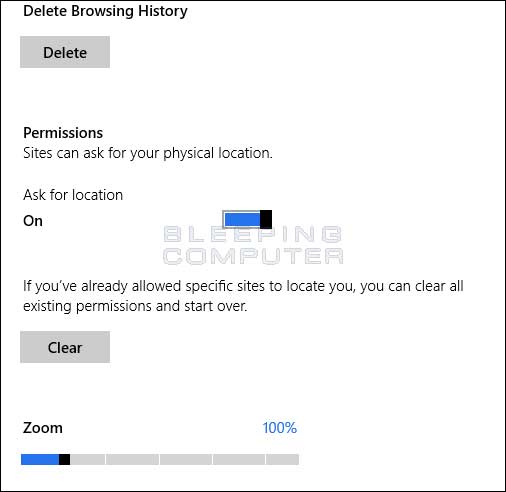
If you are in a Windows App, the Options charm also allows you to configure various settings for that particular app. This may include your login information, where you are located, or your zip code. For example, in the Internet Explorer app you will be able to change some settings on how Internet Explorer works or clear your browsing history.

Internet Explorer options

The Charm Bar is an important tool in using Windows 8 properly. By mastering the Charm bar, you will find the Start screen will become more intuitive and easier to use. If you have any questions regarding the Windows 8 Charm bar, please ask us in the Windows 8 Forum.
Continue Reading →

New Features for Windows 8

New Features for Windows 8

By now you probably know that the new Windows 8 operating system from Microsoft was built to compliment touch-enabled monitors. If you don’t have such a monitor, you might be wondering if the other features are enough to warrant an upgrade at any price. Let’s take a look.

Windows 8 Features

The biggest change with Microsoft 8 is the new, tile-filled interface screen (called Metro) that makes your monitor look like an over-sized smartphone loaded with apps. If you really hate the interface, or if you keep tapping the monitor with your finger despite not having a touchscreen, it’s possible to turn it off altogether. Check out this handy article from PCWorld for awalkthrough on how to turn off Metro and get back the old Windows home screen you’re used to. Once you do, you’ll be impressed by a new – yet familiar – operating system that runs faster than Windows 7 and offers several handy new features, including:

Startup Time

Unlike Windows 7, Windows 8 stores your system state and memory contents so it can load them from the disk on reboot, instead of having to reload everything from scratch, which takes a whole lot longer. While results will vary from machine to machine, reports are that starup time with Windows 8 machines is half of what it was on Windows 7.

Windows Store

You have much easier access to the Windows Store where you can buy free and paid apps. While many of these are touch-based apps, you’ll also find a nice selection of mouse-friendly ones, too.

Built-In Antivirus

After you install Windows 8, you will automatically have Windows Defender on your computer, which is a hearty little antivirus program that offers ingoing and outgoing protection against malware.

Automatic Cloud Storage

Everything from your address book to your system settings can be stored in the cloud. Then you can access it on any Windows 8 PC. You can get your personal PC experience on your home computer, work laptop, and even at a friend’s house if they have a Windows 8 machine.

System-Wide Search

It’s a lot easier to hunt down that lost MP3 with the faster, more responsive system-wide search available in Windows 8. The search also connects to the Internet, so it’s really your one-stop-spot for browsing on your computer.
Continue Reading →

Find us on Facebook

Categories